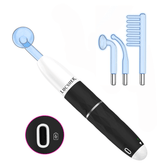
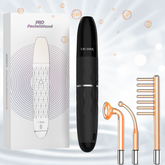
In our fast-paced world, finding time for self-care can be challenging. However, maintaining healthy, glowing skin doesn’t always require a trip to the spa. With the right techniques and tools, you can give yourself a professional-quality facial in the comfort of your own home. This comprehensive guide will walk you through the process of performing an at-home facial, including the use of advanced skincare tools like the Lucsuer high frequency wand for optimal results.
The Benefits of At-Home Facials
Before we dive into the step-by-step process, let’s explore the numerous benefits of giving yourself a facial at home:
-
Cost-effective: Professional facials can be expensive, especially when done regularly. At-home facials allow you to save money while still maintaining a high standard of skincare.
-
Convenient: No need to schedule appointments or travel to a spa. You can perform your facial whenever it suits you best, whether that’s early morning or late at night.
-
Customizable: You have complete control over the products and techniques used, allowing you to tailor the facial to your specific skin needs and preferences.
-
Consistent care: Regular facials are key to maintaining healthy skin. At-home facials make it easier to stick to a consistent skincare routine.
-
Hygiene control: In your own home, you can ensure that all tools and surfaces are clean and sanitized to your standards.
-
Relaxation: Creating a spa-like atmosphere at home can be a great way to unwind and de-stress.
Now, let’s delve into the detailed steps of giving yourself a professional-quality facial at home.
Step 1: Cleanse Your Skin
A thorough cleanse is the foundation of any effective facial. This step removes makeup, dirt, oil, and other impurities that accumulate on your skin throughout the day.
-
Remove makeup: Start with a gentle makeup remover. For waterproof or long-wearing makeup, use an oil-based remover. Gently massage it into your skin, paying special attention to your eyes and lips.
-
First cleanse: Use an oil-based cleanser to break down any remaining makeup, sunscreen, and excess sebum. Massage it into dry skin using circular motions, then rinse with lukewarm water.
-
Second cleanse: Follow up with a water-based cleanser suitable for your skin type. This will remove any remaining impurities and prep your skin for the next steps.
-
Water temperature: Use lukewarm water throughout the cleansing process. Water that’s too hot can strip your skin of natural oils, while cold water won’t effectively remove impurities.
-
Pat dry: Gently pat your face dry with a clean, soft towel. Avoid rubbing, which can irritate the skin.
Pro tip: For an extra deep cleanse, consider using a cleansing brush or silicone cleansing pad during your second cleanse. These tools can help exfoliate and increase blood circulation.
Step 2: Exfoliate
Exfoliation is crucial for removing dead skin cells, unclogging pores, and promoting cell turnover. This step can dramatically improve skin texture and appearance.
-
Choose your exfoliant:
- Physical exfoliants: These include scrubs with fine particles like jojoba beads or rice powder. They work by physically sloughing off dead skin cells.
- Chemical exfoliants: These contain ingredients like alpha-hydroxy acids (AHAs) or beta-hydroxy acids (BHAs) that dissolve the bonds between dead skin cells.
-
Application technique:
- For physical exfoliants: Apply a small amount to damp skin and gently massage in circular motions. Focus on areas prone to congestion like the nose and chin.
- For chemical exfoliants: Apply evenly across the face, avoiding the eye area. Some may be left on as a treatment, while others are rinsed off after a few minutes.
-
Frequency: Exfoliate 1-3 times a week, depending on your skin type and the product used. Those with sensitive skin should exfoliate less frequently.
-
Gentle approach: Be careful not to over-exfoliate, as this can lead to irritation, redness, and even damage to the skin barrier.
Pro tip: If you’re new to exfoliation, start with a gentle product and use it once a week. Gradually increase frequency as your skin adjusts.
Step 3: Steam Your Face
Steaming opens up your pores, softens blackheads and whiteheads, and prepares your skin for deeper cleansing and better product absorption.
-
Prepare the steam: Boil water and pour it into a large, heat-safe bowl. For added benefits, you can add a few drops of essential oils like lavender or eucalyptus.
-
Position yourself: Drape a large towel over your head and lean over the bowl, keeping your face about 12 inches away from the water.
-
Steam duration: Steam your face for 5-10 minutes. If you have sensitive skin or rosacea, limit the time to 5 minutes or less.
-
Breathing: Take deep, relaxing breaths. The steam can help clear your sinuses as well as your pores.
-
Aftercare: Gently pat your face dry with a clean towel.
Alternative method: If you’re short on time or prefer a gentler approach, use a warm, damp towel. Hold it against your face for a few minutes to achieve a similar effect.
Caution: Be careful not to get too close to the hot water to avoid burns. If you have very sensitive skin or certain skin conditions, consult with a dermatologist before steaming.
Step 4: Apply a Mask
Masks can provide targeted treatment for various skin concerns. Choose a mask that addresses your specific needs:
-
Clay masks: Ideal for oily or acne-prone skin. They help absorb excess oil and draw out impurities from the pores.
-
Hydrating masks: Perfect for dry or dehydrated skin. Look for ingredients like hyaluronic acid, glycerin, or aloe vera.
-
Antioxidant-rich masks: Great for aging skin or those exposed to a lot of environmental stressors. Ingredients like vitamin C, green tea, or resveratrol can help protect and repair the skin.
-
Exfoliating masks: These often contain AHAs or BHAs and can help improve skin texture and tone.
-
Calming masks: For sensitive or irritated skin, look for masks with ingredients like chamomile, oatmeal, or niacinamide.
Application tips:
- Apply an even layer over your face, avoiding the eye area and lips.
- Use a clean brush or your fingertips to apply the mask.
- Leave on for the recommended time, usually 10-20 minutes.
- If the mask starts to dry and feels tight, remove it before it’s completely dry to avoid dehydrating your skin.
Pro tip: While waiting for your mask to work its magic, place cool cucumber slices or tea bags over your eyes to reduce puffiness and soothe the delicate eye area.
Step 5: Incorporate Advanced Skincare Tools
This is where the Lucsuer high frequency wand comes into play. High-frequency treatments can significantly enhance your at-home facial by providing professional-grade care.
Benefits of high-frequency treatments:
- Improves product absorption by increasing circulation
- Stimulates collagen and elastin production
- Reduces the appearance of fine lines and wrinkles
- Helps to clear acne-causing bacteria
- Shrinks enlarged pores
- Improves overall skin texture and tone
How to use the Lucsuer high frequency wand:
-
Prepare your skin: Ensure your face is clean and slightly damp. You can apply a thin layer of water-based serum or gel to help the wand glide more smoothly.
-
Choose the right attachment: Most high-frequency devices come with different shaped attachments for various areas of the face. The mushroom-shaped attachment is great for larger areas, while the pointed attachment works well for spot treatments.
-
Set the intensity: Turn on the device and select the appropriate intensity level. Always start with the lowest setting and gradually increase as needed.
-
Application technique:
- Gently glide the wand over your face in circular motions.
- Keep the wand moving constantly; don’t leave it in one spot for too long.
- Focus on areas of concern, such as fine lines, acne-prone zones, or areas with enlarged pores.
- Use for 3-5 minutes total, spending about 30-60 seconds on each area of the face.
-
Post-treatment care: After using the high-frequency wand, your skin will be more receptive to skincare products. Follow up with serums and moisturizers for maximum benefit.
Safety notes:
- Always follow the manufacturer’s instructions for the Lucsuer high frequency wand.
- Start with the lowest intensity to avoid skin irritation, especially if you have sensitive skin.
- Avoid using the device if you have metal implants, pacemakers, or certain skin conditions. Consult with a dermatologist if you’re unsure.
Step 6: Apply Serums and Moisturizer
After the high-frequency treatment, it’s time to nourish and hydrate your skin with targeted treatments.
-
Serum application:
- Choose serums that address your specific skin concerns. Some popular options include:
- Vitamin C for brightening and antioxidant protection
- Hyaluronic acid for deep hydration
- Niacinamide for pore refinement and oil control
- Peptides for anti-aging benefits
- Apply 2-3 drops of serum to your fingertips and gently pat into your skin.
- Allow each serum to absorb for 30-60 seconds before applying the next one.
- Choose serums that address your specific skin concerns. Some popular options include:
-
Eye cream:
- Use your ring finger to gently tap eye cream around the orbital bone.
- Be careful not to pull or tug at the delicate skin in this area.
-
Moisturizer:
- Choose a moisturizer appropriate for your skin type.
- Apply a dime-sized amount and gently massage into your face and neck using upward motions.
- Pay extra attention to any dry areas.
-
Facial oil (optional):
- If you have dry or mature skin, consider adding a few drops of facial oil to your moisturizer or applying it as a final step.
- Gently press the oil into your skin rather than rubbing it.
Pro tip: Layer your products from thinnest to thickest consistency for optimal absorption.
Step 7: Massage Your Face
Facial massage can improve circulation, promote lymphatic drainage, and help your products absorb better. It’s also a great way to relax and connect with your skin.
-
Prepare your hands: Ensure your hands are clean and warm them up by rubbing them together.
-
Choose a medium: You can massage with clean hands, but using a facial oil or your moisturizer can help your fingers glide more smoothly.
-
Massage techniques:
- Start from the center of your face and work outwards and upwards.
- Use your fingertips to make small, circular motions along your jawline, moving up towards your ears.
- Gently pinch along your eyebrows, moving from the center outwards.
- Use your index and middle fingers to make circular motions on your temples.
- Lightly tap around your eyes to improve circulation and reduce puffiness.
-
Duration: Spend 5-10 minutes on this relaxing step.
Pro tip: For an extra treat, use a rose quartz or jade roller for part of your massage. These tools can help reduce puffiness and feel wonderfully cooling on the skin.
Step 8: Final Touch - Facial Roller or Gua Sha
To enhance the benefits of your facial massage, consider incorporating tools like a facial roller or gua sha stone.
-
Facial Roller:
- Store your roller in the refrigerator for a cooling effect.
- Start at the center of your face and roll outwards and upwards.
- Use light pressure and roll each area 3-5 times.
- Pay extra attention to areas of tension, like the jawline and forehead.
-
Gua Sha:
- Hold the gua sha tool at a 15-degree angle to your skin.
- Apply gentle pressure and stroke upwards and outwards.
- Focus on areas like the cheekbones, jawline, and forehead.
- Use longer strokes on the neck to promote lymphatic drainage.
These tools can help:
- Reduce puffiness
- Improve blood circulation
- Enhance product absorption
- Promote lymphatic drainage
- Relax facial muscles
Pro tip: Clean your facial roller or gua sha tool after each use with soap and water, or wipe with alcohol to sanitize.
Tips for Maximizing Your At-Home Facial
-
Frequency: Perform a full at-home facial once a week. Adjust based on your skin’s needs and response.
-
Timing: Choose a time when you can relax without interruptions. Many people prefer evenings, as it allows for a peaceful wind-down routine.
-
Hydration: Drink plenty of water before and after your facial. Well-hydrated skin responds better to treatments.
-
Environment: Create a relaxing atmosphere with soft lighting, calming music, and perhaps some aromatherapy.
-
Consistency: Establish a regular skincare routine for best results. Your daily routine should complement your weekly facial.
-
Patch test: Always test new products on a small area first, especially if you have sensitive skin.
-
Sun protection: Always follow up with SPF during the day, as some treatments can make your skin more sensitive to sun damage.
-
Diet and lifestyle: Remember that skincare isn’t just about what you put on your skin. A balanced diet, regular exercise, and good sleep habits all contribute to healthy, glowing skin.
Customizing Your Facial for Different Skin Types
For Oily/Acne-Prone Skin
- Use a clay-based or charcoal mask to absorb excess oil
- Focus on gentle, non-abrasive exfoliation to avoid irritating acne
- Incorporate the Lucsuer high frequency wand to target acne-causing bacteria
- Choose oil-free, non-comedogenic products
- Don’t skip moisturizer – look for lightweight, gel-based formulas
For Dry Skin
- Opt for a hydrating, creamy mask
- Use a gentle, hydrating exfoliant – avoid harsh scrubs
- Emphasize moisturizing steps – layer serums and oils under a rich cream
- Consider using a humidifier in your room to add moisture to the air
For Sensitive Skin
- Skip harsh exfoliants – opt for enzyme-based exfoliators if needed
- Use shorter steaming times or skip steaming altogether
- Choose fragrance-free, hypoallergenic products
- Patch test all new products before use
- Focus on calming and strengthening the skin barrier
For Aging Skin
- Focus on products with antioxidants, peptides, and retinol
- Use the Lucsuer high frequency wand to stimulate collagen production
- Incorporate facial massage to improve elasticity and circulation
- Don’t forget the neck and décolletage area
- Use an eye cream to target fine lines and crow’s feet
The Power of Consistency
Remember, the key to seeing results from your at-home facials is consistency. While a single treatment can provide immediate benefits like increased hydration and a healthy glow, regular facials will lead to long-term improvements in your skin’s health and appearance.
Keep a skincare journal to track your progress and note how your skin responds to different products and techniques. This can help you refine your routine over time for optimal results.
Conclusion
Giving yourself a facial at home can be a rewarding and effective way to care for your skin. By following these steps and incorporating advanced tools like the Lucsuer high frequency wand, you can achieve professional-quality results without leaving your home. Not only will you save time and money, but you’ll also gain a deeper understanding of your skin’s needs and how to address them.
Remember to listen to your skin and adjust your routine as needed. With practice, you’ll perfect your at-home facial technique and enjoy the benefits of radiant, healthy-looking skin. So go ahead, set aside some time for self-care, and treat yourself to a spa-like experience in the comfort of your own home. Your skin will thank you for it!
